Character 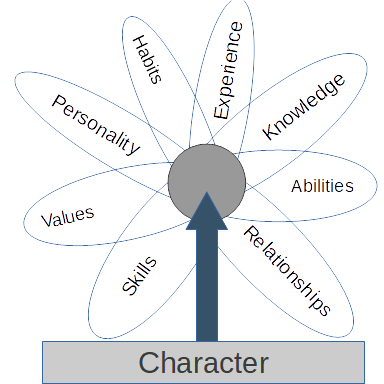 is the sum of a person’s habits and qualities. It is the center of a Venn diagram of your skills, knowledge, abilities, values, relationships, past experiences, habits, and personality. Developing good character helps develop a good reputation, which helps gain influence. Others determine whether or not you are a good leader, or have the potential to be a good leader, by observing common traits in the character of other good leaders. Developing good character traits is within your control.
In his book Leaders Eat Last, Simon Sinek tells a story about the order leaders in the military eat. He reports that without orders or instruction that enlisted military members eat before the noncommissioned officers, and noncommissioned officers before officers, according to rank. The reality is, those lessons are taught to junior leaders. As a brand new howitzer section chief, I decided to eat during a break in firing, before the rest of my section. I reasoned they could go to chow when we resumed firing, but I needed to be on the gun to supervise operations. As I neared the front of the line, I was approached by my platoon sergeant. He noted he had not seen several of my Soldiers yet. He sent me back to my gun without chow and directed me to eat after the rest of my section. The military trains leaders well, and learning to take care of troops is a key lesson that is taught.
The battery resumed firing before I was able to eat. I still had Soldiers going to chow. I did eat that evening. The last guy from my section brought me a plate of food because he knew I would miss chow during the fire missions. I learned the lesson of why leaders eat last. When leaders take care of their troops, their troops will take care of them.
 That first lesson I learned during field feeding taught me the importance of taking care of those you lead. When your followers know you are taking care of their needs, they know they can focus on their tasks required to accomplish the mission. They know you have their back. That only happens when leaders receive trust from those they lead. Trust turns into respect. Respect creates disciplined organizations. Disciplined organizations accomplish great things in the face of adversity.
Anyone can build the kind of character that encourages others to follow them. Look at each element of character. To acquire any of those attributes, potential leaders need to act. Action is the key to leading others.
Knowledge
Leaders need education. Three pillars of gaining knowledge include institutional education, personal development, and real world assignments. Each provides different opportunities to learn.
Institutional education provides general information about the topics included in the course of study. The lessons learned in the classroom provide a background to help people think and reason when problem solving. One learns the theory behind the practice.
Real world assignments provide opportunities to apply classroom lessons. New graduates are given low level, simple issues to resolve. They are closely supervised to ensure they understand the expectations as they apply their knowledge. These opportunities allow people to apply their classroom knowledge and make mistakes on low-risk assignments in order to develop deeper understanding of underlying principals in their lessons.
Self development describes a variety of educational means. Examples include reading topical books and journals, asking for extra assignments to meet stretch goals, field trips to locations relevant to the work, and self selected training events or conferences. The smart young leader figures out what knowledge s/he needs to improve his or her performance and finds a way to gain that knowledge. Self development is viewed by more senior leaders as a key indicators of younger leaders potential for greater responsibility. It is demonstrative of their diligence.
Skills and Abilities
Most of the skills and abilities required of leaders have little to do with doing the work of the organization. Knowing how a machinist works a piece of metal, a warehouse employee finds a widget, or what day employment taxes need to be filed generally are important details for others. Knowing those things need to be done and finding the right people to do them is the leader’s job. Leadership requires skill to develop effective processes, the ability to apply influence to seniors, peers, and subordinates alike, and ensure resources are available.
Many have said that leaders lead people, and managers manage things. Someone can be a good manager and a bad leader. Leaders who are poor managers never become good leaders. Managing resources is an important skill so your followers have required resources to do their jobs.
Habits
I had a friend, Gerry Berry, who often said something like, “You always make time for the things that are important to you.” This would often come up when we would discuss doing something together outside of work; we being a few of us. It was rare that our little group of friends could always find the same day and time to do something with everyone. He would direct that line to those who had previous commitments as a way of reminding all of us about the importance of how we choose to use our time. Others determine what we value by the choices we make including how use of time.
Gerry developed an aggressive form of cancer while he was still young. He dreamed of building a barn for his wife and son so they could move the horses they loved to his home. Several of his friends developed a plan to build the barn before he died. At no time were all his friends present on the property at the same time. However, over the course of a week, everyone found some time to participate in some way. What do your habits tell others what you find important?
Experience
 Unlike the other factors discussed above, we only have limited control of our experiences. A person may seek out experiences, but sometimes you have to be in the right place at the right time with an open mind and properly prepared for some experiences. There are plenty of experiences people can control and obtain. You can choose to hike the Appalachian Trail and gain that experience. You can choose to develop a speaking program and present it to several local civic groups to demonstrate expertise in a subject area. Not everyone can go to Harvard, but most people can complete college if they really want and have a college experience. Not everyone can perform in Carnegie Hall, but there are plenty of performance venues if you want to perform.
Trying new things and pushing yourself outside your comfort zone allows you to understand more things in life. You become more emphatic with the plight and victories of others. You learn and gain knowledge. You learn about abilities you did not possess and you learn about others. There are plenty of things you can do to broaden you experiences.
Relationships
I often heard an expression that one can tell much about another by the way s/he treats those who can do nothing for them. Too often we treat co-workers better than friends or family members and our bosses better than co-workers. We believe we have to display our best behaviors at work, and we should. If we go back to the integrity thought, our treatment of friends and family is really a reflection of what we do when others are not watching. Yes, you have to be on your best behavior at home.
People of character treat everyone with respect and dignity. That does not mean you have to agree with everyone all the time about everything. Actually, to give that impression is disrespectful and not helpful. How you disagree with others is a true indicator of your respect for another person. It is okay to agree to disagree. People notice the character of your relationships to determine whether or not they should develop one with you. People want and need to interact with others. People who value others, find others value them. You demonstrate your value others by paying attention to them. Ignore your phone. Your social media feed will wait until you are alone. Focus your attention on the person in front of you.
Be on time. When you tell someone you will meet them at a certain time, do it. Adopt the idea that being early is being on time, being on time is late, and being late is unacceptable. Never keep your boss, a client, a friend, or a family member waiting.
Do what you say you are going to do. If you fail to fulfill promises, no one will trust you. It is better to under promise and over deliver than miss a deadline.
Personality
There are lots of personality tests out there. People take them for many reasons. Your tested personality is irrelevant. Many personality test questions ask what you prefer. What you prefer does not dictate what you do. What you do matters, even if it is not your natural preference.
Learn to take charge of your preferences, control them, and do what is necessary in any given moment. There are times to speak and times to listen. There are times for action and times to wait. I think this ends with, “There is a time to every season under heaven.” (Ecclesiastes 3:1-8). These lessons are from ancient knowledge. Wisdom comes from learning when and how to apply them.
 The foundations of character date back eons. Periodic reviews, such as this blog, keep lessons fresh in people’s minds. Each of us can change our behavior to improve our character.
Character is the foundation of leadership because it forms a solid base of power to influence others. Character is the focus of your knowledge, skills, abilities, values, relationships, and personality. People are predisposed to behave certain ways in situations based on each of these factors. Because people are self-aware, they can judge how their behaviors in each area affects their chosen path. People can choose responsible character building behaviors rather than their preferred responses. Successful leaders understand when and how to match their behaviors to those required for best results. Application becomes easier with practice and reflection. People make mistakes. Smart people learn from their mistakes. Work on your character in order to build a strong foundation as a leader.
Photo Credits
Venn Diagram by the author Creative Commons Attribution
Chow Line from US DOD by SSGT Greeson, USMC public domain
Knowledge Management by Roberto Saltori from flickr.com CC Attribution Reuse
Wild Blue Yonder from pxhere.com CC0
Nature Forest House from pxhere.com CC0 — cropped by the author

 Slide decks are high tech training tools when used properly help improve information transfer by embedding several types of media as well as text. Too often, they become little more that a high tech chalk board. You remember chalk boards, those black things teachers wrote text on they wanted students to remember. If a teacher took time to write something on the chalk board you know it was likely to show up on the next test. Most slide decks fail to emphasize what is really important. With so much text, there are no powerful points in text based presentations. Like a chalk board, an easel with chart paper is a low tech teaching tool that is portable.
  Yes you can write words on chart paper which may serve as a tool to share important points. You can also use chart paper to record students thoughts and ideas during a class discussion. You can pull out those ideas later in the class to reinforce important learning points. When well planned, a good trainer draws a picture as s/he speaks, really draws on the pad a picture. Students are amazed at the trainer’s ability to draw while speaking. Using chart paper effectively in training takes planning, preparation, and practice.
 Using a facilitated discussion allows students to share what they already know. This knowledge may not be known to everyone in class. This method involves the student. Student involvement increases information retention. If this information is foundational to later points in your lesson and you intend to refer back to it, chart paper is the perfect method of capturing and presenting these points.
 the grid on your chart paper. Copy the lines from the small print to the large paper lightly with pencil until you have the image you want. In both cases, you can see the lines well enough to recreate the image as you present your message verbally. Your students will not see the lines.
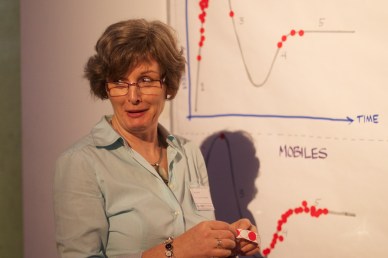 Writing takes time. Use this time to encourage students to take notes as your write. You know they have time to write down important points if you are writing them at the same time. When creating illustrations or charts, students demonstrate improved understanding of processes. They also participate more because they think and reflect as you draw resulting in a livelier class.1 Student participation improves student retention.

 Some decisions should be delayed, but most can be made quickly. Making decisions at the correct point frees the time by avoiding waffling that robs not only your valuable time, but also energy. Avoid going back and forth over the same options. Making a decision at the appropriate time eliminates stress, confusion and anxiety you feel about making mistakes. Most decisions fail to work out as planned requiring adjustments along the way. Taking greater control builds your trust with others and your confidence to make good decision. Decision-making skills are like exercise. When you exercise more, you develop fitness factors that increase your physical ability. Making decisions increases your self-confidence and your ability to make better decision. You create positive momentum because it’s easier to make decisions when you believe in yourself and your abilities.



 Many organizations confuse training and education. Training is a process of teaching people skills. Education is a process of transferring ideas or knowledge. Often organizations educate people but call it training. People learn ideas and gain knowledge from education. People learn skills from doing the required task. Education is necessary to build skills. Building a skill is not required to aquire knowledge or learn new ideas. This is were the disconnect between education and training occurs. Trainers think passing ideas and knowledge to learners means learners understand how to use the information to complete tasks. For people who posses skill in a given area, this may be true. More often, new learners need practice completing the skill one task at a time after receiving foundation ideas and knowledge. People learn skills by doing.
 In the movie, The Karate Kid, Mr. Miyagi teaches Danny several karate defensive moves through the process of household chores. Miyagi never tells Danny why he is expected to complete certain tasks in the prescribed fashion, only to follow instructions. Eventually, Danny learns the basic skills of karate.
 Completing the educational piece of the training sets up students to work on skills. Whether the skill is making a peanut butter and jelly sandwich, conducting an analysis of data, or building a rocket motor to take a space vehicle to Mars, knowledge is the basis of the skill. Skill building exercises begin the process of changing ideas and beliefs into actions to achieve results.
 Every skill building exercise should be developed to allow students to connect the skill to information learned during the educational portion of the training. Connecting knowledge to skills improves understanding so when things go wrong, students can trouble shoot the situation. Teachers and instructors cannot teach students how to respond to every possible situation they may encounter. Connecting skills to knowledge allows students to effectively solve problems in the real world.
 present opportunities to provide additional information and improve understanding. Use mistakes as opportunities to expand student knowledge of how a task step effects the overall skill.

 He told his classmates he devised a simple system using spreadsheet software to track employee issues. Every morning he made a list of people to contact to follow up on those issues ensuring they were addressed. His actions allowed employees to focus on their work, not their problems. His habit of tracking people’s problems and checking with them periodically, resulted in a reputation of being a compassionate leader. He only spoke with others who had a reason to know about the problem in order to provide support to the employee or help resolve the problem. He did not gossip. His habit of keeping his mouth shut gained him the reputation of being trustworthy. His habits and actions told others the story of how he felt about resolving people’s problems, not a speech delivered from a soapbox about being there to help his people. His character was defined by what he did, not what he said.
 Power is commonly obtained in one of a few ways. The first is positional power, that which an organization give an individual in supervisory positions. Another is expert power. If you are an expert by means of knowledge on a topic, or possess a critical skill that you use and share. You sway others by your expertise. A third source of power is attraction. That ability some people have to draw the positive attention from others and to make others want to be liked by them. Often called charisma, it enables those endowed with it to influence people by bestowing attention on those seeking their approval. A final source of power is reward and punishment. This sounds like something a boss can do, such as providing a wage increase, or dismissing an employee. In this example it is not someone in a position of authority. People who use rewards and punishment for power include people like playground bullies, or a grass roots community activist. Each finds ways to reward and punish people they influence outside traditional organizational structures. Some example include using force in the case of the bully, or endorsing a political candidate in the case of the activist. These rewards and punishments lack official sanction. The power comes from the personal traits of the individual such as strength or speaking ability.
  Learning to develop power across several sources is a skill necessary to influence others. Each has benefits and limitations depending on the skill of the wielder, the situation, and the audience. Each is a tool. One cannot build a house only using a saw; likewise, one cannot lead well with only one source of power.
 This story illustrates the importance of knowing your audience and the message they need to hear. As the instructor pointed out, if the message is what the candidates needed to request to install a flagpole, the communication is different than directing a Soldier to emplace the flagpole. Of course if the Soldiers were less experienced than the Platoon Sergeant, the instructor needed to provide more direction. The senior person in the story understood he was directing another experienced person to complete a task. Detailed instructions were not required.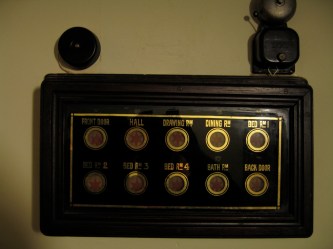
 confronting unacceptable behaviors and addressing uncomfortable truths, such as failures to reach revenue expectations. Setting standards is action. Leaders execute by jumping in, getting their hands dirty and shoes messy. Doing something dirty is action. Leaders develop power and influence by doing things; acting, not just talking and planning. If you are not doing, you are not leading. Leading is a verb. Verbs are action. Actions, executed properly at the right time by the right right people result in success. You can plan. You can talk. You can be virtuous. You accomplish nothing until you act.
 Viet Nam War Memorial on the Mall in Washington, D.C. with the Soldiers he led in battle. As she approaches and walks along The Wall, she relates memories of her David in various assignments and contrasts them with how she thinks combat veterans she is there with think about their memories of the war, each other, and their beloved commander.
 I found myself contemplating each name that caught my eye. I wondered how my brain selected some names to look at while skipping over others. My thoughts wandered to my own combat experiences. I mentally compared my experiences to those who fought in Viet Nam and eventually to every other war.
 That is why a Gold Star Wife can accompany a veteran wearing a Combat Infantry Badge and feel connected. Each brings their own stuff, projects it on the tall, cold, black stone and The Wall, like a black hole, absorbs it all. Visitors do need not know any one person of the 56 thousand inscribed on those black shiny panels to project their stuff on to it. The Wall accepts everything just as the service members whose names appear on The Wall.
 The Wall, even with all those names carved into the otherwise flawless surface is a blank slate, enabling all to search for meaning. Like the classroom blackboard each person can write the story of how events years ago changed the world and their place in the world. Each finds meaning.
 It is hard to make the colossal statue of Lincoln something else. The size of the World War II Memorial is like the war, massive, so massive it is hard to take in all of it and understand, even after the passing of time.
  The Soldiers marching at the Korean War Memorial are always on patrol, frozen in time, with little room for any other interpretation. Only The Wall absorbs our feelings and casts back what we need to develop understanding.

 Ken Blanchard spent many years working to improve leadership, training people tactics and habits gleaned from successful leaders. His philosophy is tell them, show them, let them, correct or redirect or praise them, and repeat (Be, Know, Do. Blanchard). In an earlier training article, I discussed whys to improve knowledge transfer in the telling stage using checks on learning. This article focuses on the show them stage. Having more methods to teach people ensures you connect with as many learners in your class as possible. If you only tell them things, visual and kinetic learns are left behind. There are several ways to show people. This article discusses three methods of showing; pictures, videos, and demonstrations.
 Picture based slides showing stances, methods, screen shots, and other action are showing. Pictures may contain text for the purpose of showing finer points. You may want to add an arrow for direction of action, or to show points of attention. The image shows how and what to do saving thousands of spoken and written words.
 If you create a video, do not simply transfer the classroom lecture to the screen. Use video showing someone doing the skill you are teaching. Sound is not required. You can narrate the action for the class. Consider inserting pauses in the video allowing discussion.
 who only shows a trick once to prevent others from learning how he did the trick, your goal is for students to leave your training knowing the tricks and how to perform them. Repetition ensures your students understand and improves their skill.

 Assign a protegee to the mentor who is dealing with performance problems. Often we think of performance problems as coming from problem employees. Frequently though performance problems come from inexperienced people, or people assigned new tasks without appropriate background or training. Use your subject matter expert to teach this person how to improve. As they work with the newer person, they may find a need to refer back to their original class notes. Good thing they typed them so they are legible! Because you modeled goal setting with your employee, they use that skill to help their protegee set goals. Your newer, inexperienced person benefits from the training provided to the mentor weeks or months ago, another return on your investment. Instead of sending this person to the same training to learn the basics, you book them for something different. When they return, repeat the process and you have a new expert on a different topic.
 There is a better way to make sure your student learn material and for you to know they learned what you taught. Conduct checks on learning during and at the end of your training. Checking learning ensures they heard and retained what you taught. Two simple ways to check learning are simple exercises and questioning.
 Students and trainers come together for the purpose of transferring knowledge and skills to students. Each has a responsibility to enable learning. The trainer’s responsibility is to ensure the knowledge and skills are received, understood, and usable when students leave the training. Checks on learning completed throughout the lesson provide necessary feedback on the success of the transfer. Conducting a review at the end of class by repeating what you previously said is easy. Completing an in-depth check on learning as a review is harder, but shows what has been learned. Students and instructors can leave the training environment confident the new knowledge and skills have been passed and are ready to be used upon returning to their daily assignments.
 When setting goals, task steps are the pavers on your path to accomplishment. Accomplished goals are the cobblestones of your road of life-time achievements. Your achievements define who you are as a person.
 Next, figure out what you desire to accomplish in your life. Stephen Covey talks about what you want your obituary to say. Unless you have reason to believe it is likely you will die in the next three to five years, perhaps thinking about what you want people to say about you in five years may be a better example. As you think about your accomplishments remember the many facets of your life. The facets in your life cause you to focus on events and opportunities in different ways. Some facets of life include personal, family, spiritual, health, community, and professional. A goal that covers multiple areas of your life will feel more fulfilling when accomplished. General people can only focus on fewer that four big goals at anytime. Aligning large and small accomplishments in each area helps improve opportunities for success.

 Whether it is a sales pitch to a valuable customer, a strategy about a change in business practice for your boss, or a training for a group of employees, you know you are about to shine. The lights come up and it is show time. At the end of your presentation, you realize things could have gone better. You ask yourself, “What went wrong?” The answer is you failed to rehearse. Rehearsals are an overlooked preparation, separating professionals from amateurs. No actor would ever step foot on stage without rehearsing; neither should you.
 Rehearsals are like proofreading a document. Few professionals would send out their first draft of a letter. The best have others look over the content, for spelling and grammar. A presentation rehearsal accomplishes the same thing. It allows you to find errors before your audience sees the product. Steve Jobs was notorious for rehearsing dozens of hours before any presentation. TED speakers rehearse hundreds of times before appearing on the red spot.
 Time yourself. Practice with the time counting up and counting down. There are plenty of mobile applications available to help you meet your time hacks. You should know where you need to be in your presentation at particular points in time. Move quickly through your introduction. Quick introductions all time to present main points. Leave at the end to fit a quality conclusion. There is an old adage, “Tell them what your are going to say; say it; tell them what you said.” A rule of thumb for an introduction and conclusion is about 10% of your time for each. That leaves at least 80% of your time for the supporting points of your thesis. End a little short of your allowed time is better than running a few seconds long. The best way to nail your time is rehearsing.
 Record your rehearsal; watch your recording. Reviewing your recorded presentation allows you to edit. By the time you are on stage it is too late. Recording your presentation allows you to hear the pace and volume of your speech. You observe mannerisms, good and bad. You hear words that work well, and not so much. The recording allows you time to fix the bad and improve the good.
 You wonder where you went wrong. The truth is you did a great job. Your boss understands the importance of asking critical questions about everything in the organization. The knows to verify things that appear to be one thing to ensure they are not something else. With experience, the boss learned the right questions to ask related to a host of issues and situations.
 Socratic questions that stimulate discussion and analysis may include:
 Whether you are developing a course of action to market a new product, or deciding where to go on your next vacation, learning to ask the right questions helps you make better decisions. Questions that challenge conventional thinking allow decision makers to identify alternative courses of action and determine if they would be effective. Allowing others to challenge your conclusions with Socratic questioning improves your logical thinking. As you step into your next leadership position, or prepare a briefing for the boss, take time to think about questions to uncover the best solution to any situation.
