Note-Taking Guides in Training

Man_taking_notes-PXHere

Taking notes during class is a tried and true method to improve information retention. Developing a note-taking guide or workbook is a great way to encourage your students to take notes during class. A good note-taking guide is more than the traditional presentation handout with three slides on each page and lines in the right column. A good note-taking guide requires active participation by students to record and receive all the information. It takes time to develop a good guide. It begins as you plan your lesson. Here are some tips and ideas to make a great note-taking guide for your students in leader training.

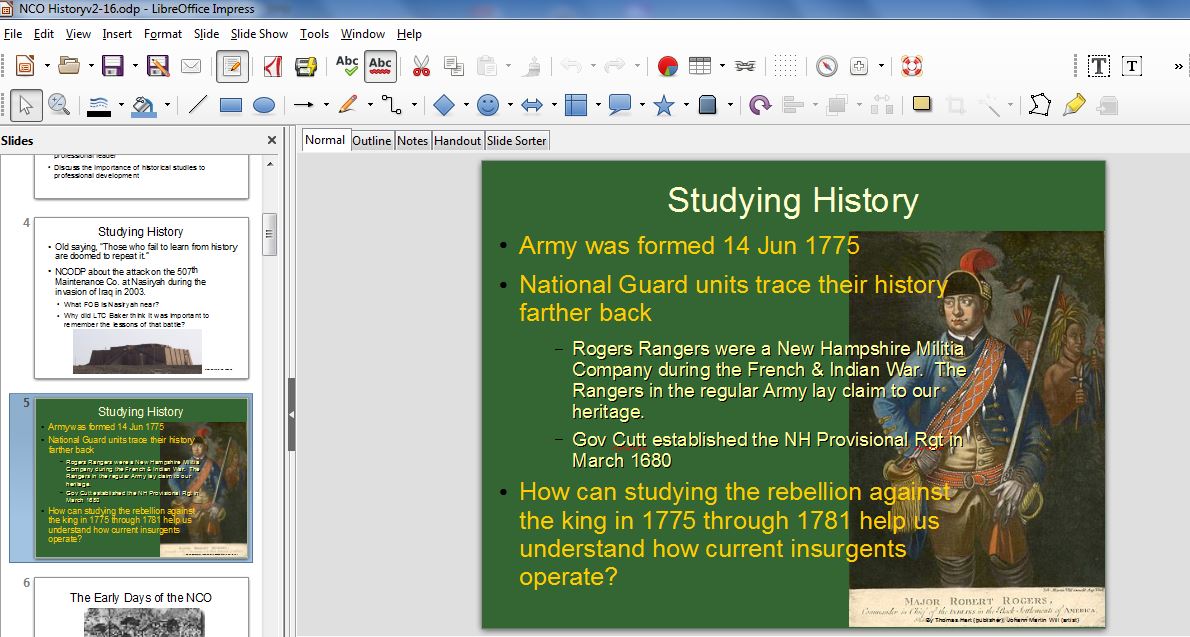
Using your slide deck is a great place to start. You can simply replace key text with underscores to create blank spaces for students to complete. If you select the two slide per page option, the slide is large enough for the student to write their answers. If you develop great slides, the kind with pictures and little text, using the fill-in-the-blank method will not work. A little creativity, however, allows you to incorporate pictures into your note-taking guide and still provide a space for the student to insert keywords for retention. The SMART Goals page is an example of using this idea. Using pictures in your workbooks reinforces the ideas from your slideshow. You need to creatively find ways so students will insert the keywords to help them remember the meaning of the picture.

There are times when text is necessary such as introducing laws, rules, definitions, or quotes. Replacing keywords from the text with blank spaces is a great way to ensure students record the key ideas from messages requiring lots of text. Often, students who do take notes in a traditional notebook try to copy every word of every slide. When they take notes this way, they miss the supporting information spoken by the instructor. The blank space replacement method permits enough writing to reinforce important messages from the slide, and also allows the student to listen to the explanatory message from the teacher. Providing some additional space allows the student to record connections they make from the information to their experiences.

Fill In The Blanks.jpg

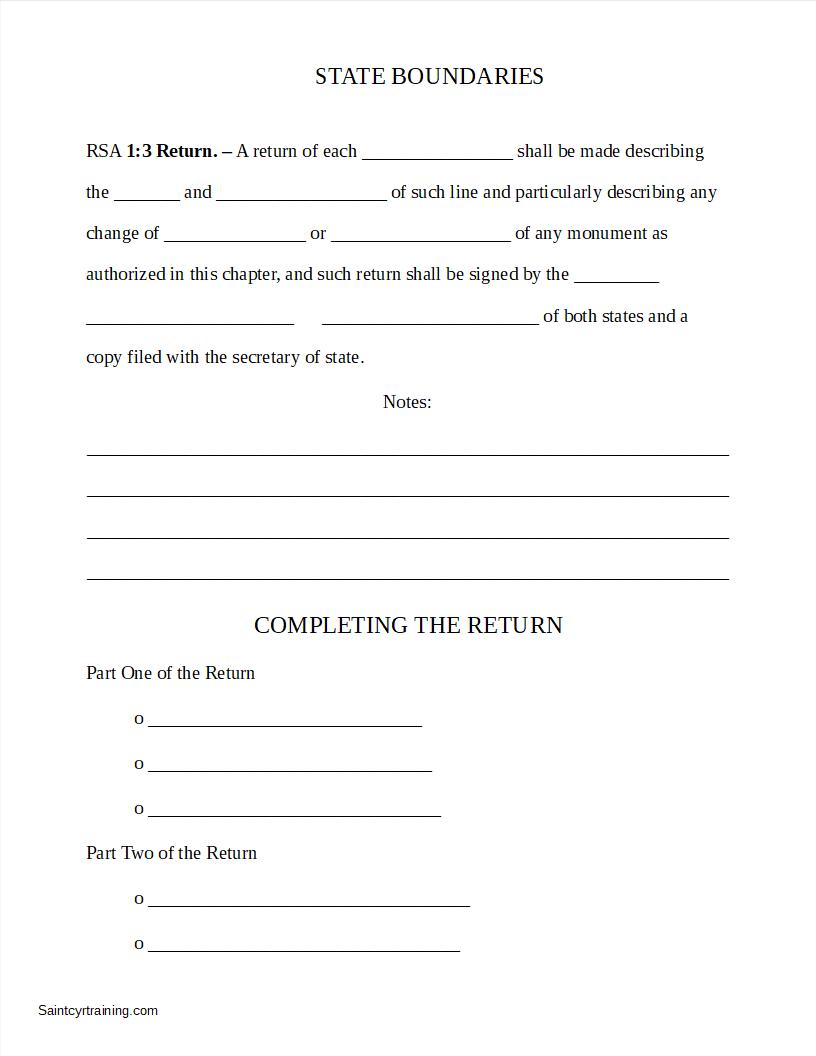
Copy the high points of your lesson outline into a separate word processing document. Using this method provides the same information as slides, but allow you to reduce the information in the workbook. It also is a great way to provide a note-taking guide if your slides do have lots of pictures instead of text. Go back and delete important points and replace them with the blank line. The blank lines send a message to students that the missing information is important. Having the high points puts students on notices about the general direction of the training. They know when important information is coming and are understand what the main ideas are versus the supporting ideas. Another method is to provide the category of information and then place an empty numbered list below the heading.

Training classes should have learning activities sprinkled throughout allowing students to practice what they learned. Use individual, collective, and small group activities during leaders training. The note-taking guide is the perfect place to insert worksheets, instructions for exercises, or a place to record reflections of the learning activity. Frequently individual worksheets become separated from students notes. When they return to the notes later in their lives, they lose the benefit of the lessons learned during the classroom exercises using worksheets. If those learning steps are part of the class workbook, they are available to students days or years later when they reflect on finer points of the training that they want to remember at that later time.

As you prepare the note-taking guide, you will find it tempting to include everything from every slide in your presentation. Do not do it. I took a two-day class some time back. The students were provided with copies of the slides later. There were over 300. I have a two day class on professional decision making I teach. There are less than 80 slides. The note-taking guide allows students to note the most important learning points from your lesson. No one is going to easily find the information they are looking for by reviewing 300 slides. When I attend a training, I try to limit my class notes to one or two typed pages per hour of class time. With that number in mind, you should aim to only have one or two workbook pages for students for every hour of class. This number does not include any worksheet activities. If the class I took with 300 slides had information from each slide in the note-taking guide, the document would probably be 150 pages. Notes should be a summary of what is learned in class. A 150-page notebook is not a summary.

goal setting cycle.jpg

Flow charts showing processes and decision points are great for inclusion in note-taking guides. The page includes all of the steps and decision points but excludes text. Include text for the most critical points so students have that information after class. Leaving most of the steps empty however requires the students to pay attention and fill in the blanks. When they leave class, they have a model of the whole process. The remember more of the process because they wrote it down in the note-taking guide. They can return to it anytime and review the process improving the quality of their work without supervision in the future. Their behaviors conform to the organization’s expectations which is the point of conducting training.

Developing a note-taking guide for leaders training is a way instructors encourage students to take notes during class. A well designed note-taking guide serves as a workbook by including adequate space for structure and unstructured note-taking, forecasts what points will be made during the training, includes worksheets for use during learning activities, provides pictures with meaning, process charts for student completion, and improves lesson retention. Students structured notes to refer to in the future to share their learning with others, and to refresh their learning. An ideal note-taking workbook is one or two pages for every hour of training exclusive of any learning activity worksheets. The guide is not a copy of the slide deck used in the presentation, rather it complements the slide deck. A well designed note-taking guide improves learning but takes time to develop. Development begins as you work on your lesson plans. Your students will leave class thinking you are the profession expert you professed to be when you provide a quality note-taking guide.


Image Credits

Person Taking Notes:  PXHere.com-no attribution information.

Workbook page examples: Author from examples of his note-taking guides.

The RSA language is from NH.gov.

Student Engagement

Ask, Pause, Call

Good instructors engage their students during the training.QuestionMark.byme.png Inexperienced instructors struggle to learn ways to involve their students. A simple, yet effective method is Ask, Pause, Call.

Every instructor has experienced the long silence after asking a question about a point he is sure the students know the answer. The teacher knows understanding this point is necessary before presenting the rest of the information. He stands in front of the room wondering what to say next.

The Ask, Pause, Call method provides a means for instructors to engage their students and ensure the class is receiving and understanding the information. The first step is as simple as it sounds; ask the question. The next is to pause. This allows the students to think about the response to your inquiry. Next ask a particular student to answer the question.

Use this model from the beginning of your class for greatest effectiveness. When used from the beginning of the class you establish the model as the standard. Students will expect you to use Ask, Pause, Call through out the class and will expect to participate.

Pause.byme.JPGAsking questions through out your training helps students pay attention. They never know when you will call upon them to answer a question. It allows them to make connections to other learning and experiences. Their answers let you know if they are receiving and understanding the information, or if you need to represent the information using a different approach.

You want to know that all your students are learning. It is important to call on everyone in the class, not just those who always raise their hands. Every class has a few students who hang back and chose not to participate, however the only way to know if they are tracking the information is to engage them too.

An effective method to drag those shy students out is to reverse the model. First call on the student by name. Pause to ensure you have their attention. Ask the question.

Asking a question that only requires a yes or no response is a good way to begin. After you receive the answer, follow up by asking the student a why or how question. If the answers are what you expected, finish up by summarizing raisedhand-steven-lilleytheir answers to make the learning point. If they are a bit off, follow up with leading follow up questions that tends to suggest the correct answer.

Ask, Pause, Call is an effective model to engage students in discussion during training. Selecting different students during the training ensures you know all are tracking the important information you are teaching. Asking questions of your learners through out the training keeps them engaged improving retention and understanding. Including students in the lesson allows them to connect the information you present with prior learning so it make sense for them. The next time you teach, ask a question, pause for thought, then call on someone to answer.


Photo Credits

Question Mark and Pause Button by Author

Raised Hand by Steven Lilley at http://www.flickr.com under a creative commons attribution license.

Don’t Kill Your Audience with a Deck of Death

welcome

Today’s Topic

“Hi. I’m your expert instructor here to teach you how to be an expert almost as good as me. Next slide.”

agenda

“So you can see here all that we are going to cover over our period of training. I’m sure you will notice that I have done all I reasonably can to remove any fun we might have learning this material because I did it all on my slide deck. Next slide.”

LEARNING GOALS

“I made sure to include some learning goals because everyone expects them, but we really are not going to talk about anything like this; don’t worry, it is all in the slide deck because I am such an expert on this topic. Next slide.”

slide-deck

Anyone still awake, or have you all succumb to the slide deck of death? To often, out-of-town experts are hired to train people whose only real expertise lies in preparing really cool slide decks. There is more to training however than a wiz-bang slide show, especially if the topic is mostly information known to the students. Slides have become the go-to choice for training because they provide consistency across a variety of training presentations regardless of the ability of the instructor or the knowledge of the students. There are other forms of media available for instructors to communicate ideas and guide discussions. Learning to use them well improves your presentation.

boards.JPG

These two forms of media are often overlooked for a variety of reasons including poor penmanship, artistic ability of the trainer, and lack of standardization over multiple presentations. The biggest reason is a lack of imagination. Several years ago I learned a little trick to improve my drawing ability in Richard Neil’s book, Police Instructor. Neil suggests creating an image in your favorite graphics program them projecting it onto your paper. Using a #2 pencil, lightly trace the lines. When you reach the point in your presentation to introduce the sketch, grab your marker and draw away while you talk to your students. You end up with the same image from class to class and impress your students with both your knowledge and artistic ability.

I used this secret in an instructor development class I was teaching to explain the training cycle. I asked one of the students to step up to the easel and sketch out a diagram of the cycle while I talked about it. He was a bit apprehensive until he was close enough to the board to see the lines. The class was equally impressed with mine and the student’s knowledge of the cycle, and the secret, once it was revealed. Two lessons in one, how to improve your use of media and improve your understanding of the training cycle, a grand slam!

It may not be possible to recreate a fancy drawing or diagram on a white board in the same way, but for basic imagery it is a great tool. Create lists revealing one point at a time so students are not overwhelmed with information. Alternate colors so students can track lines easier. Practice so your writing is recognizable to others. Simple diagrams that are well thought out ahead of time are easy to draw on a white board with lines and arrows to make connections with thoughts that are expressed in text. Try it out in your next class; you might be surprised how it catches your students attention.

POSTERS

Posters seem like they have gone the way of the dodo bird. They are a great tool to ensure continuity from class to class. They work even when the projector bulb doesn’t. Use dry erase markers to high light important words or ideas on laminated posters.  This technique helps make connections between ideas.

You can create posters using a professional service, or in your living room using markers. Boil down your ideas down to the most essential elements to reduce the number of them. Too many posters end up being nothing more than a low tech slide deck that you have to lug around. The more you have, the heavier they are!

pd.JPG

Too many people use boxed PEs they like from other classes. Using the general format and adapting it to meet your needs however allows you to end up with a product unique to yourmarshmallowtower-marktighe class that is designed specifically to meet your training objectives. Good practical exercises are copied by instructors because designing them is tough work. The first time you have a student build a pasta tower to the ceiling and perches his or her marshmallow at the top, you realize it is better to use your own ideas to reinforce your learning points.

Good exercises challenge students to apply the lessons you teach. They make students think critically about using new skills in familiar situations. They provide students the confidence to adapt your lessons in their every day life, changing their habits and behaviors, and that’s what training is supposed to be about, changing behaviors.

VIDEO CLIPS

Video Clips are great to introduce problems, demonstrate your point, show how to complete an activity, or as part of a practical exercise. Too often trainers use videos as the basis for their entire training, instead of supporting their training and learning points. There are plenty of good videos available on any of the video host web sites. If you are using video for an educational purpose then it should spur discussions and questions about topics related to your learning goals. If not, then it is entertainment and you may have problems with copyright laws. If your video does all the teaching, then students are unlikely to see you as the expert you profess to be.

next.JPG

Next slide please.  Slide decks have become an important part of the training landscape. Slide decks are not going away soon. Trainers communicate better using other forms of media instead of only using slides. Other forms of media require trainers to think about the points they want students to learn. Each media offers opportunities to engage students, keeping their attention to improve learning outcomes. Posters, chart paper, white boards, practical exercises, and video clips each offer instructors opportunities to break away from the slide deck and improve learning. Each form of media has pros and cons. Use a variety of media in your training to break up the boredom of the slide deck and show your students you really are an expert.

– – – – – – – – – – – –

Photo Credits

Author except the marshmallow tower.  Marshmallow tower by Mark Tighe under Creative Commons Attribution license from flickr.com:  https://www.flickr.com/photos/mjtmail/14113827338/in/photolist-o2yZKQ-8W4FUQ-8W1CxZ-nvc49E-9NDbrG-9NDcWb-9NDdLs-9NApRH-9NAur2-9NAmLB-9NAnBt-jeQaVE-9NAtKa-9NAsga-9NAsXc-9NDhzm-9NAorP-Hsu3i-bDzKGQ-dc4jeH-8xac39-BMSG49-BXt5Le-8Ur9Rp-rV2Uwa/

Oh No! Mandatory Training!

Mandatory refresher training…the bane of every instructor. Frequently the trainer is provided a lesson plan and a slide deck, a period of time to fill and appropriate training facilities (maybe). The instructor is expected to stand before the group of experienced students and present the material determined by management as essential. The result one to four hours of heavy eyelids, sore bottoms and the sending and receiving of text messages on mobile devices by distracted employees who fail to pay attention. They learn nothing. You can improve the situation by recognizing that the occupants of the room possess hundreds of collective hours of experience; many more qualified to teach than you. Developing methods to engage, entertain and focus students during mandatory training separates the run-of-the mill instructor from the master trainer. Nothing that follows is new, but I challenge you to adopt one or two of these ideas for your next refresher training and take your first step down the road to become a master trainer.M.CoghlanGpDisc

Facilitation is a training process that focuses on the student rather than the instructor. Generally facilitate means to make easier, to promote or to serve as a catalyst (Google 2014). An instructor who engages in facilitation recognizes the expertise of the students and develops a learning environment that permits those with various experiences on a given topic to share what they know allowing the rest of the students to assimilate those experiences into new ideas on their own. This process allows the students to come to conclusions on their own.

Instructors are reluctant to conduct facilitated discussions for fearing accusations they did not follow the program of instruction required by management. A well thought out training event covers all the points required by management. The difference between an interesting, facilitated training event and being buried by slides is how the material is presented. The traditional, well-known, boring method of lecturing while showing a slide deck echoing everything the presenter says only ensures the required material has been presented. It does nothing to demonstrate knowledge transfer, but does provide coverage for the tushy if ever called to task for providing training on a given topic. A facilitated training however requires student participation during a guided discussion about the same points made in a lecture. In order to participate effectively, instructors must possess complete understand the topic, and students should have some knowledge.

Preparation for and conduct of a facilitated training event requires greater preparation and execution time. To prepare for a facilitated discussion,

  • Review and understand key learning points of the lesson,
  • Convert learning points into discussion points,
  • Prepare questions to requiring discussions to answer, and
  • Prepare to guide student discussion by infusing information and making corrections,
  • During the conduct of class,
  • Ask students questions that require thought and development of opinions,
  • Ask students what they think of points made by others during the discussion,
  • Require students to justify opinions based on facts or prior learning,
  • Ask students if they agree or disagree with other students points and explain why or not.

As the class demonstrates understanding of each point, the instructor segues into the next discussion point by either asking a pre-planned question, or taking advantage of a point raised by a student. Ensuring many students participate. Use the following formula to include all students:

  • ask the question,
  • pause to wait for students to think about the answer,
  • call on a student to answer.

When attempting to pull in the quieter students, it is important to ensure to ask them something there is no wrong answer. By doing so, you allow them to participate without loosing face. As the discussion moves along, show the required slides and let them speak for them selves allowing students to integrate the information from the slides into what they learned in the discussion.

A quality facilitated discussion during mandatory training improves student participation. Increased participation improves information retention. Increased participation permits the same idea to be expressed more than one way improving understanding by less experienced students. Engaged students are less likely to allow their minds to drift and learn more. Students pay attention when they know anyone can be called upon to answer questions. The slide deck re-enforces points made by the students.

Using a facilitated discussion during mandatory in-service training allows for management and instructors to cover important learning points. A good guided discussion covers all required points by allowing students to express their knowledge of the topic and identifies areas requiring more discussion or information. With more discussion the same idea is expressed in different words increases understanding of the concept. Students become responsible for their learning, more engaged in the process and focused on the class. For your next training event, implement some of these ideas to generate a guided discussion on one or more points. You may be surprised at what YOU learn in the class you are teaching.

—————————

References

Google Search Results “define facilitate” https://www.google.com/search?q=define+facilitate&ie=utf-8&oe=utf-8&aq=t&rls=org.mozilla:en-US:official&client=firefox-a&channel=sb retrieved 4/26/14

U.S. Army. 157-ABIC-3.0 / Army Basic Instructor Course (ABIC) (2011) Army Training Support Center, Ft Eustis, Va

—————————

Photo Credit:  Michael Coghlan.  flickr.com CC license

Better Presentations

Last week I had the opportunity to attend a terrific training presented by Jon Blum of Force Concepts. One thing that set his training apart from others I have attended was his slide deck. He followed two simple rules to keep his slide simple and effective. With some thoughtful planning, a little research and some practice with layout your next presentation can benefit from the same principals Jon employed. The first principle is minimize text. The second is maximize images. Image
The original popular presentation software PowerPoint was named so to help presenters make the points of their presentations powerfully. They were intended to be short and sweet. A common rule is to limit the text on a slide to six words per line and no more than six lines per slide. Often presenters read their slides verbatim which defeats the point of inserting the bullet point on the screen. The audience can read. They came to your presentation to hear what you have to say. If the only thing you say is what is written on your slides, they could have stayed in their offices and read your work. I suggest that you tell your group what your want to say, pause then show the slide and allow them to read the text on their own. The points on your slide should emphasize what you said.
Another great thing Jon did in his presentation was the way he presented the text on the slide. First he discussed the point. Next he showed the text and led a discussion about the point. Upon conclusion of the discussion on that point, he introduced the next point and then revealed the text. The previous line remained visible, but the font was in a light shade of gray drawing the viewer’s eye to the current point. Identifying the few simple words that effectively communicate the idea behind the point of discussion requires you to identify the principals and key points of your presentations.
How many times have you said or hear that a picture is worth 1,000 words; at least a thousand? How many pictures have you seen in a slide presentation? I would guess the answer is few. Today images are inexpensive and plentiful. Choices include charts, graphs, clip art and photographs. Websites such as flickr.com, gettyimages.com and shutterfly.com have a large selection of photos to purchase, within the public domain or under the Creative Commons license. Sometimes finding the right photo or image on line is time consuming, but with the advent of digital photography and paint software you can create your own images that convey your message. The images I use to attract readers to my blog are my own creations or images I found on line available under the Creative Commons license for use by only providing attribution to the person who took the photo.
When selecting an image, pick one that communicates your message. You may use a few words to ensure your point is understood or to ask a question to start a discussion. If you use text with your image, keep it shorter than the suggestions offered above.
Following simple rules improve the slides you use in your presentations. Reduce the text on your slide. Use pictures and communicate 1,000 words without uttering a syllable. It may not always be possible to limit your idea to six words or to one picture, but with practice implementing these principals becomes second nature. As you prepare your next presentation, add a few extra pictures and subtract some words. Your audience will be grateful.

For a more detailed disucssion about improving your presentations, check out my Prezi at http://prezi.com/uaxckg-4fkkn/using-media/. Another great resource is http://www.slideshare.net/ArtilleryMarketing/you-suck-at-powerpoint-12040413.  Update 3/15/14:  57 slides in 18 minutes…exact amount of text during the presentation…zero!!!! http://www.youtube.com/watch?v=bOYIKJho18I&feature=youtu.be

Photo credit: Kei Kondo add.me flickr.com

Practice, Practice the Practical Exercise

One of the joys of being Chief Instructor at a military school house is the time I shared with instructor trainees during their final presentations becoming qualified Army Instructors. During one memorable presentation, the student instructor engaged classmates with two practical exercises. The first allowed students to work in small groups discussing how to apply lessons learned upon returning to their units. In the second, students developed a presentation for their commanders for adoption of principals of this lesson in their units. Both effectively ingrained important points of the lesson by allowing the students integrate what they prior knowledge with newly acquired information to develop their own ideas and reinforced what the instructor taught. This presentation raised several questions including why instructors choose to lecture instead of facilitate, use presentation software instead of practical exercises and how can instructors develop effective exercises to reinforce learning points.

Inexperienced instructors often choose lecture based training because they have the knowledge the students need, lack the skills to develop training that is learner based. They feel more comfortable talking than showing. Developing lecture based training is easy and the least time consuming. Lectures ensure presentation of important information, adhere to time constraints and repeatedly provide the same information during every presentation. Unfortunately, most adults do not learn well with the lecture style and many will leave forgetting most of what was said, defeating the purpose of the training.

Slide decks have become the standard to accompany the lecture method. Pictures, text and video supposedly stimulate the learner’s verbal and auditory centers improving retention from lectures alone, but one phrase says it all, “Death by PowerPoint.” An unfortunate reality, PowerPoint and other presentation software alone fails to engage learners as a result, some organizations forbid use. When used well, they amplify important instruction points, but most of the time slide are used as a crutch. Plenty of books, blogs, articles, TED Talks, comedy skits and ,yes, PowerPoints have been created to improve presentations and truly Impress (an open source alternative to PowerPoint).

ImageDeveloping practical exercises requires genuine understanding of the concepts and principals supporting training, information and task steps. Understanding allows the instructor to identify the basic knowledge required to achieve success. Basic actions required to complete the task create the practical exercise the same way that learning goals are the basis for test questions. Often people are selected to provide organizational training because the have a history of providing great training or are the most educated on the topic within the organization. Lacking expert wisdom, the instructor parrots what he was taught, but their lack of understanding of the concepts and principals prevent development of practical exercises. Students are denied the opportunity to experiment and discover how to use the ideas to improve their performance.

Good practical exercises achieve several objectives for adult learners. They allow the a review of new information learned during class increasing retention. They require learners to integrate new knowledge with what they all ready know. They permit students to teach and learn from each other. They require back briefs allowing peers to learn from their challenges and successes. Each step is a repetition of the information provided in class. Each iteration, embeds knowledge and skills learned increasing the likelihood of desired change.

Lecturing and showing slides permit training to check boxes. Lectures poorly translate knowledge into desired behaviors. Practical exercises allow trainees to practice what they have been taught. They provide opportunities to repeat key points. Repetition increases recall and creates deeper understanding of the material. Creating practical exercises requires the instructor to understand the concepts and principals of the task being trained. Development requires greater time and effort by the instructor but payoffs include increased student understanding, performance and changed behavior on the job. Next time you conduct training, create and conduct at least one practical exercise.

– – – – – – – – – – – – – – – – – – –

I have prepared and posted a slide deck on SlideShare supporting this blog. 

I look forward to feedback.  Please take a moment to let me know how this blog has helped with your training and leadership activities.  I am also interested in know what other topics you are interested in reading.

Inspire Others to Go Forth and do Good

ImageAs the hour draws to a close the speaker comments on what a great bunch your group has been. She was so concerned things would not go well because she was not sure what she had to offer would meet the needs of the rest of the team or that she had enough material for the 60 minutes she was allowed. She asks of there are any questions; there are none, and thanks you all for coming. You stand up hoping to sneak out of the room before your boss has an opportunity to corner you about the poor performance of your direct report during the monthly senior staff training, too late, he yells across the room to meet him in his office in five minutes. What went wrong?

Often employees or outside subject matter experts are asked to make presentations about hot topics. Powerful presentations are not guaranteed just because the presenter possesses expert or referent power and may deny the members of the organization the inspiration to do great things with what they have learned. Even when the person makes a great presentation, they may end up talking about everything except the one or two areas of concern for your organization. Taking the time to identify objectives of what you want participants to learn helps you and the presenter focus on material that will enlighten, educate and inspire. Steven Covey calls it beginning with the end in mind.

It may seem too simple to write out a comprehensive terminal learning objective. Doing so focuses the efforts of the trainer to only that information which will help the audience achieve the final educational goal. The end result is a focused presentation meeting the needs of the audience. Steven Covey covers this principal when he advises his readers to begin with the end in mind.

There are three important parts of every learning objective whether it is the capstone objective, or a smaller piece of the puzzle. The parts are action, condition and standard. The action is what you want the student to learn how to accomplish when they complete the training. An example might be something like, “The clerk will complete a telephonic customer order on the computer.” The conditions for the task or action to be completed should include the environment and any tools or resources available while completing the action. Often training is conducted in a classroom or conference style setting and that should be reflected in the condition statement. Finally spell out how someone will know when the student has achieved success by stating the standard. This can be performance steps, standards for a finished product, a score on an examination or any other means of measuring performance. Often in a classroom this may be as simple as, “The student will respond correctly to questions related to the action.”

This is a sample of a TLO for a classroom setting where there will be no formal testing.

Action: Complete a telephonic customer order on the computer.

Conditions: A classroom environment, a block of instruction and random questions from the instructor.

Standard: Correctly answer questions related to taking a customer order on the phone and entering the data into the computer.

Ideally action statements start with a verb. Conditions describe resources available to complete the action. Standards should be measurable and attainable, very much like setting SMART goals.

Establishing learning objectives when assigning someone to conduct training improves communication and enables the trainer to understand the perceived needs of organization. Given an objective such as the one above instead of some generic statement like, “Hey Smith, I need you to give a class on that new software at the next staff training conference next week.” With the first, employees should walk out of the training understanding how to take customer orders using the new software. Who knows what you will get with the second. When you are tasked to provide training, having an understanding of the process allows you to develop a TLO, run it by the person who assigned it and then help you focus your attention on what is necessary to meet expectations.

Developing training objectives help trainers focus on presenting important information in the time allowed for students to achieve a given task. When assigned, both the manager and the trainer have better expectations of what the finished product includes. Quality learning objectives contain three parts, the action, the conditions, and the standards. When assigned by your manager to train others using a learning goal ensures you and he understand what is expected of you. Don’t let your next presentation flop. Take the time to develop an objective for the time you are given to teach others.

References

Covey, Stephen R. The 7 Habits of Highly Effective People. electronic edition. New York, NY: Rosetta Books, 2012.

Henry, V. E. (2002). The COMPSTAT paradigm: management accountability in policing, business, and the public sector. Flushing, NY: Looseleaf Law Publications.

http://www.grayharriman.com/ADDIE_Writing_Learning_Objectives.htm

Photo by tiffa 130 on flicka  http://www.flickr.com/photos/tiffanyday/4233065842/sizes/o/in/photolist-7s4yZQ-8Wryi-ffna1C-47iP3d-52AQpJ-bGYWzB-4AufPZ-6tcK9H-9TLQ4V-8NuGDD-8Hg5U4-9JMiVv-9JMita-9JgqsL-7YrzMS-dKTJnF-8HpL4e-BFAGU-eNMWSj-eNNwHC-7n4gRh-eNN2rq-bZzNxs-c4SdKS-c5qaBj-c4SXZQ-bZH6nN-bZSrEN-c5EoAW-bZyRyh-5Vc4Mb-5Vc4uY-gx8cF-e4GEBY-dtYtxp-5F11Pu-4gL5v1-4tppYd-Gfs6t-BXKac-c5ECoN-c5Er4b-c5EzqU-c5EtBq-c5Es7u-c5EpMy-c5Ev57-c5EAUf-c5ExWq-bZPjLw-bZPucw/ used with a CC Attribution Licesne.